现在百度云盘的限速会经常导致在备份数据的时候,传的上去,下不下来。与其花钱买 VIP 不如自己搭建属于自己的私有云。 本文介绍在 Linux 上部署 Nextcloud 网络硬盘 。有需求的可以配合 nps 进行内网穿透, 实现在外网的访问。
1 检查环境
Nextcloud 使用 LAMP 环境即可,软件的安装就不赘述了。关于 PHP需要检查必须包含以下插件,可以使用 php -m | grep -i <模块名称> 来检查是否安装了该模块。
PHP (7.1, 7.2 or 7.3)
PHP module ctype
PHP module curl
PHP module dom
PHP module GD
PHP module iconv
PHP module JSON
PHP module libxml (Linux package libxml2 must be >=2.7.0)
PHP module mbstring
PHP module openssl
PHP module posix
PHP module session
PHP module SimpleXML
PHP module XMLReader
PHP module XMLWriter
PHP module zip
PHP module zlib
根据使用的数据库软件,下面三个插件必须包含一种
PHP module pdo_sqlite (>= 3, usually not recommended for performance reasons)
PHP module pdo_mysql (MySQL/MariaDB)
PHP module pdo_pgsql (requires PostgreSQL >= 9.0)
2 创建数据库
在创建数据库前,先对 MySQL 进行些配置,编辑文件 /etc/php/7.3/apache2/conf.d/20-pdo_mysql.ini
; configuration for php mysql module
; priority=20
extension=pdo_mysql.so

[mysql]
mysql.allow_local_infile=On
mysql.allow_persistent=On
mysql.cache_size=2000
mysql.max_persistent=-1
mysql.max_links=-1
mysql.default_port=
mysql.default_socket=/var/run/mysqld/mysqld.sock
mysql.default_host=
mysql.default_user=
mysql.default_password=
mysql.connect_timeout=60
mysql.trace_mode=Off
编辑文件 /etc/mysql/conf.d/mysql.cnf,以限制 MySQL 的内存使用。
[mysql]
innodb_buffer_pool_size=256m
innodb_io_capacity=4000
接下来就可以创建数据库了。使用 sudo mysql -u root -p ,用 root 用户进行登录数据库,输入命令
create database nextcloud;
create user nxtcloudadmin@localhost identified by 'admin123';
grant all privileges on nextcloud.* to nxtcloudadmin@localhost identified by 'admin123';
flush privileges;
exit;
这样得到的数据库信息如下
Database user: nxtcloudadmin
Database password: admin123
Database name: nextcloud
Database host: localhost
3 修改 Apache 运行用户
默认情况下 Apache 使用单独的用户运行,方便进行权限管理。但这样做会在我们访问外部存储时造成权限混乱,所以将 Apache 的运行用户设置 我们的常用用户。编辑文件 /etc/apache2/envvars ,修改下面行
export APACHE_RUN_USER=pi
export APACHE_RUN_GROUP=pi
4 外部存储
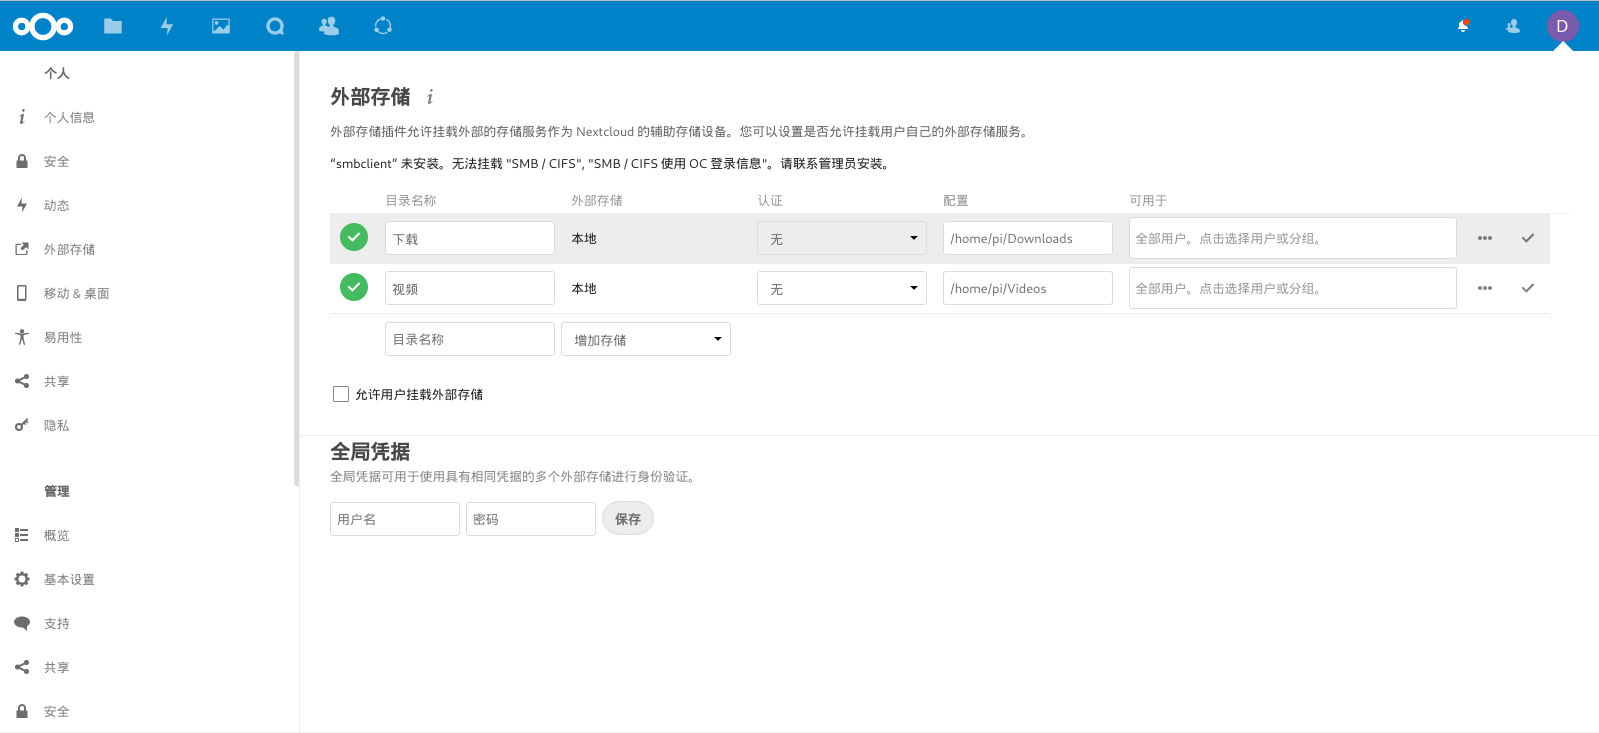
除了在初始化服务器时指定的存储空间外,使用其他空间都需使用 外部存储 功能。需要注意,修改的是管理中的存储空间,而不是个人中的存储空间。
对于移动硬盘、U盘等设备 Linux 中可能需要手动挂载,才能使用。使用 blkid 命令查看设备路径、 UUID 、硬盘格式等信息。然后可以使用 mount 命令进行挂载,例如
mkdir /media/pi/disk
sudo mount /dev/sda1 /media/pi/disk
如需要自动挂载,可以编辑文件 /etc/fstab ,在其中添加行
UUID=2158fd9b-655d-40c9-9eb6-86bccc96af03 /media/pi/disk ext4 defaults 0 0至此已经实现了全部功能,后面是对性能的优化。
5 PHP 设置
编辑 /etc/php/7.3/apache2/php.ini ,修改下面项
memory_limit = 512M
upload_max_filesize = 16G
post_max_size = 16G
max_input_time = 3600
max_execution_time = 3600
upload_tmp_dir = /var/big_temp_file/
output_buffering = 0

[opcache]
opcache.enable=1
opcache.interned_strings_buffer=8
opcache.max_accelerated_files=10000
opcache.memory_consumption=128
opcache.save_comments=1
opcache.revalidate_freq=30
/var/big_temp_file 使用用来存储大文件的临时文件,需要手动建立目录并改变所属用户和用户组。
6 使用 Redis 进行缓存
Debian/Ubuntu/Mint 系统安装 redis-server 和 php-redis 。安装完成后系统会自动启动服务。CentOS/Fedora 系统安装 redis 和 php-pecl-redis 。安装完成后需要手动启动服务。完成后使用 ps ax 查看服务是否正常运行
ps ax | grep redis
22203 ? Ssl    0:00 /usr/bin/redis-server 127.0.0.1:6379
编辑文件 /etc/redis/redis.conf
unixsocket /var/run/redis/redis-server.sock
unixsocket /dev/shm/redis.sock
重启 web 服务和 redis 服务。
sudo systemctl restart redis
sudo systemctl restart apache2
在配置文件中 ./config/config.php 中加入
  'memcache.local' => '\OC\Memcache\Redis',
  'memcache.locking' => '\OC\Memcache\Redis',
  'filelocking.enabled' => 'true',
  'redis' => array(
     'host' => '/var/run/redis/redis-server.sock',
     'port' => 0,
     'dbindex' => 0,
     'password' => '',
     'timeout' => 1.5,
  ),
7 Cron
使用 crontab -u www-data -e 编辑 cron 文件,其中 www-data 为 web 服务器的运行用户。如果用前面的方法更换了 web 服务器的运行用户,这里也需要更换成对应用户。在文件中加入
*/5 * * * * php -f /var/www/html/nextcloud/cron.php其中 /var/www/html/ 为 nextcloud 所在文件夹。
8 URL 美化
编辑 ./config/config.php,如果Nextcloud 位于名为 nextcloud 的二级目录中,则将对应行修改为
'overwrite.cli.url' => 'https://example.org/nextcloud',
'htaccess.RewriteBase' => '/nextcloud',
如果在根目录上则修改为
'overwrite.cli.url' => 'https://example.org/',
'htaccess.RewriteBase' => '/',
更新 htaccess 文件
sudo -u www-data php /var/www/nextcloud/occ maintenance:update:htaccess如果没有生效,可能需要在 Apache 配置文件中加入
<Directory "/var/www/nextcloud/">
AllowOverride All
</Directory>
根据情况修改目录、用户名
9 使用 docker 容器
使用 docker 可以减少本机中软件复杂程度,方便安装管理。安装好 docker 后运行下面命令启动 nextcloud 服务。其中 -p 为端口映射,-v 为存储空间映射。
docker run -d -p 81:80 -v /home/pi/nextcloud:/var/www/html -v /media/disk:/mnt nextcloud从容器中访问本机数据库为远程访问方式,需将前面数据库配置中的 localhost 换为 %,表示接受任意地方的访问
create database nextcloud;
create user 'nxtcloudadmin'@'%' identified by 'Dong1966';
grant all privileges on nextcloud.* to 'nxtcloudadmin'@'%' identified by 'Dong1966';
flush privileges;
exit;
从容器中访问的数据库地址使用 ip address 查看,如下所示的信息表示地址为 172.17.0.1
4: docker0: <BROADCAST,MULTICAST,UP,LOWER_UP> mtu 1500 qdisc noqueue state UP group default
    link/ether 02:42:f6:8c:a0:8a brd ff:ff:ff:ff:ff:ff
    inet 172.17.0.1/16 brd 172.17.255.255 scope global docker0
       valid_lft forever preferred_lft forever
    inet6 fe80::42:f6ff:fe8c:a08a/64 scope link
       valid_lft forever preferred_lft forever
配置 /etc/my.cnf 将其中的 [mysqld] 字段中 bind-address 配置为 0.0.0.0 。
10 Nginx 配置
将下面代码保存为 /etc/nginx/sites-enabled/nextcloud.conf。其中 unix:/var/run/php/php7.3-fpm.sockcloud.example.com、/etc/ssl/nginx/cloud.example.com.crt、/etc/ssl/nginx/cloud.example.com.key 需根据实际情况修改。
upstream php-handler {
    #server 127.0.0.1:9000;
    server unix:/var/run/php/php7.3-fpm.sock;
}

server {
    listen 80;
    listen [::]:80;
    server_name cloud.example.com;

    # Enforce HTTPS
    return 301 https://$server_name$request_uri;
}

server {
    listen 443      ssl http2;
    listen [::]:443 ssl http2;
    server_name cloud.example.com;

    # Use Mozilla's guidelines for SSL/TLS settings
    # https://mozilla.github.io/server-side-tls/ssl-config-generator/
    ssl_certificate     /etc/ssl/nginx/cloud.example.com.crt;
    ssl_certificate_key /etc/ssl/nginx/cloud.example.com.key;

    # HSTS settings
    # WARNING: Only add the preload option once you read about
    # the consequences in https://hstspreload.org/. This option
    # will add the domain to a hardcoded list that is shipped
    # in all major browsers and getting removed from this list
    # could take several months.
    #add_header Strict-Transport-Security "max-age=15768000; includeSubDomains; preload;" always;

    # set max upload size
    client_max_body_size 512M;
    fastcgi_buffers 64 4K;

    # Enable gzip but do not remove ETag headers
    gzip on;
    gzip_vary on;
    gzip_comp_level 4;
    gzip_min_length 256;
    gzip_proxied expired no-cache no-store private no_last_modified no_etag auth;
    gzip_types application/atom+xml application/javascript application/json application/ld+json application/manifest+json application/rss+xml application/vnd.geo+json application/vnd.ms-fontobject application/x-font-ttf application/x-web-app-manifest+json application/xhtml+xml application/xml font/opentype image/bmp image/svg+xml image/x-icon text/cache-manifest text/css text/plain text/vcard text/vnd.rim.location.xloc text/vtt text/x-component text/x-cross-domain-policy;

    # Pagespeed is not supported by Nextcloud, so if your server is built
    # with the `ngx_pagespeed` module, uncomment this line to disable it.
    #pagespeed off;

    # HTTP response headers borrowed from Nextcloud `.htaccess`
    add_header Referrer-Policy                      "no-referrer"   always;
    add_header X-Content-Type-Options               "nosniff"       always;
    add_header X-Download-Options                   "noopen"        always;
    add_header X-Frame-Options                      "SAMEORIGIN"    always;
    add_header X-Permitted-Cross-Domain-Policies    "none"          always;
    add_header X-Robots-Tag                         "none"          always;
    add_header X-XSS-Protection                     "1; mode=block" always;

    # Remove X-Powered-By, which is an information leak
    fastcgi_hide_header X-Powered-By;

    # Path to the root of your installation
    root /var/www/nextcloud;

    # Specify how to handle directories -- specifying `/index.php$request_uri`
    # here as the fallback means that Nginx always exhibits the desired behaviour
    # when a client requests a path that corresponds to a directory that exists
    # on the server. In particular, if that directory contains an index.php file,
    # that file is correctly served; if it doesn't, then the request is passed to
    # the front-end controller. This consistent behaviour means that we don't need
    # to specify custom rules for certain paths (e.g. images and other assets,
    # `/updater`, `/ocm-provider`, `/ocs-provider`), and thus
    # `try_files $uri $uri/ /index.php$request_uri`
    # always provides the desired behaviour.
    index index.php index.html /index.php$request_uri;

    # Default Cache-Control policy
    expires 1m;

    # Rule borrowed from `.htaccess` to handle Microsoft DAV clients
    location = / {
        if ( $http_user_agent ~ ^DavClnt ) {
            return 302 /remote.php/webdav/$is_args$args;
        }
    }

    location = /robots.txt {
        allow all;
        log_not_found off;
        access_log off;
    }

    # Make a regex exception for `/.well-known` so that clients can still
    # access it despite the existence of the regex rule
    # `location ~ /(\.|autotest|...)` which would otherwise handle requests
    # for `/.well-known`.
    location ^~ /.well-known {
        # The following 6 rules are borrowed from `.htaccess`

        rewrite ^/\.well-known/host-meta\.json  /public.php?service=host-meta-json  last;
        rewrite ^/\.well-known/host-meta        /public.php?service=host-meta       last;
        rewrite ^/\.well-known/webfinger        /public.php?service=webfinger       last;
        rewrite ^/\.well-known/nodeinfo         /public.php?service=nodeinfo        last;

        location = /.well-known/carddav     { return 301 /remote.php/dav/; }
        location = /.well-known/caldav      { return 301 /remote.php/dav/; }

        try_files $uri $uri/ =404;
    }

    # Rules borrowed from `.htaccess` to hide certain paths from clients
    location ~ ^/(?:build|tests|config|lib|3rdparty|templates|data)(?:$|/)  { return 404; }
    location ~ ^/(?:\.|autotest|occ|issue|indie|db_|console)              { return 404; }

    # Ensure this block, which passes PHP files to the PHP process, is above the blocks
    # which handle static assets (as seen below). If this block is not declared first,
    # then Nginx will encounter an infinite rewriting loop when it prepends `/index.php`
    # to the URI, resulting in a HTTP 500 error response.
    location ~ \.php(?:$|/) {
        fastcgi_split_path_info ^(.+?\.php)(/.*)$;
        set $path_info $fastcgi_path_info;

        try_files $fastcgi_script_name =404;

        include fastcgi_params;
        fastcgi_param SCRIPT_FILENAME $document_root$fastcgi_script_name;
        fastcgi_param PATH_INFO $path_info;
        fastcgi_param HTTPS on;

        fastcgi_param modHeadersAvailable true;         # Avoid sending the security headers twice
        fastcgi_param front_controller_active true;     # Enable pretty urls
        fastcgi_pass php-handler;

        fastcgi_intercept_errors on;
        fastcgi_request_buffering off;
    }

    location ~ \.(?:css|js|svg|gif)$ {
        try_files $uri /index.php$request_uri;
        expires 6M;         # Cache-Control policy borrowed from `.htaccess`
        access_log off;     # Optional: Don't log access to assets
    }

    location ~ \.woff2?$ {
        try_files $uri /index.php$request_uri;
        expires 7d;         # Cache-Control policy borrowed from `.htaccess`
        access_log off;     # Optional: Don't log access to assets
    }

    location / {
        try_files $uri $uri/ /index.php$request_uri;
    }
}
11自动清理回收站
通过 occ 可以手动清理回收站
sudo -u www-data php occ trashbin:cleanup --all-users通过修改 Nextcloud 路径下 config/config.php 文件可以自动清理回收站。
添加配置
'trashbin_retention_obligation' => 'auto,7',其中 7 为自动清理的天数。若没有填写天数,默认为30天。
12 其他
Apache 的超时模块可能会断开连接,所以将其禁用
sudo a2dismod reqtimeout解决 “您的网页服务器未正确设置以解析 “/.well-known/caldav” 。更多信息请参见文档。
您的网页服务器未正确设置以解析 “/.well-known/carddav” 。更多信息请参见文档。”
为了使用 CardDAV 和 CalDAV,编辑 apache 中站点的配置文件 /etc/apache2/sites-enabled/000-default.conf 在其中加入
RewriteEngine On
RewriteRule ^/.well-known/host-meta /public.php?service=host-meta [QSA,L]
RewriteRule ^/.well-known/host-meta\.json /public.php?service=host-meta-json [QSA,L]
RewriteRule ^/.well-known/webfinger /public.php?service=webfinger [QSA,L]
RewriteRule ^/.well-known/carddav /remote.php/dav/ [R=301,L]
RewriteRule ^/.well-known/caldav /remote.php/dav/ [R=301,L]
解决 “HTTP的请求头 “Strict-Transport-Security” 未设置为至少 “15552000” 秒。为了提高安全性,建议参照security tips ↗中的说明启用HSTS。”
开启 header 模块
sudo a2enmod headers编辑文件 /etc/apache2/sites-enabled/000-default-le-ssl.conf ,在 Nextcloud 域名所在单元内添加
Header always set Strict-Transport-Security "max-age=63072000;"
无法访问回收站,报错 TypeError: Return value of OCA\Files_Trashbin\Sabre\AbstractTrash::getSize() must be of the type int, float returned
进入 nextcloud 目录,编辑 ./apps/files_trashbin/lib/Sabre/AbstractTrash.php,将 getSize 函数的返回值强制转换为 int 类型。改后 getSize 函数如下
public function getSize(): int {
   return (int)$this->data->getSize();
}
删除文件 ” **** ” 时出错。
导致文件无法删除有许多原因。显示用下面命令进行文件的全盘扫描
sudo -u www-data php occ files:scan --all我在扫描结束后报错,有文件被锁。很多资料都是直接修改数据,对像我这样对数据库不熟悉的操作比较危险。可以在 config/config.php 中添加 'filelocking.enabled' => false 关闭文件锁功能。在删除文件后再删除添加的代码以恢复文件锁。
更新时报错 504 Gateway Time-out
在更新时,备份和解压步骤遇到错误
<html>
<head><title>504 Gateway Time-out</title></head>
<body bgcolor="white">
<center><h1>504 Gateway Time-out</h1></center>
<hr><center>nginx/1.14.2</center>
</body>
</html>
<!-- a padding to disable MSIE and Chrome friendly error page -->
<!-- a padding to disable MSIE and Chrome friendly error page -->
<!-- a padding to disable MSIE and Chrome friendly error page -->
<!-- a padding to disable MSIE and Chrome friendly error page -->
<!-- a padding to disable MSIE and Chrome friendly error page -->
<!-- a padding to disable MSIE and Chrome friendly error page -->
排查问题是 Nextcloud 路径 Nginx 没有权限修改 使用
sudo chown -R www-data:www-data nextcloud
将 Nextcloud 目录移植 www-data(Nginx 用户)下,解决问题。